This post was written by my colleague Davide Benvegnù, AKA CoderDave.
So, you’ve been accepted for that conference you really wanted to speak to. But they have just told you they’re going virtual, and they need you to send them the recording of your session.
And now?
I’ve been speaking at in-person and virtual conferences for years, I’ve delivered a fair number of webinars, and lately, I’ve started my own YouTube channel (check it out at youtube.com/CoderDave).
So here is what I would do.
It is a process
When you deliver a presentation to an in-person event, you have only one chance to get that right
However, when you record your session, you want it to be as perfect as possible. And you have time and resources to make it so. You can repeat some parts if you’re not happy with them and edit them later.
I usually start with the slides, if any (not all the sessions must have some slide deck!), to lay down the whole presentation flow. Then I think about the technical aspects of the demo(s).
When the demos are ready, I start writing the script. This part is pretty important: as they do in movies, you’re not going to read it during your presentation (never do that, who’s listening will be able to tell if you’re reading) but it will prove itself very useful to refresh your memory about what you need or want to say (and sometimes also about what you do not want to say).
I do not normally write a script for the part where I will talk over the slides, but I do have a script for when I talk just in front of the camera and for the demos. One piece of advice I can give is to try to do your talking in bursts: you read a bit of the script a couple of times, then you record that part, and when it’s good, you move to the next one. For me, a “burst” is about 3 to 5 lines long, but you can find your size. Recording in bursts makes you sound more natural and allows you to record a single burst as many times as you want, being then able to piece together the different parts during editing.
And when script, slides, and demos are complete, it is finally time to record!
Recording is time-consuming
It really is… For example, my YouTube videos are about 15 minutes long or so. It usually takes me about 30 minutes to write the script, 30-40 minutes to record the video, even more, if packed of demos, and at least 60 minutes to do editing and post-production.
For a 45 minutes session, like the one I’ve just recorded for the Microsoft Online Tech Forum, it took me 3 dry runs of the slides, 2 dry runs of the demos, plus different takes on some parts. Add that to the editing time, and you’ll see why I have spent almost 6 hours in total.
So yes, it really is time-consuming.
But of course, the more you do it, the smoother the whole process is.
Step up on your editing game
As I’ve mentioned before, you want your recorded session to be as high quality as possible, and your audience will expect that as well.
I’m not saying everything has to be perfect, but close enough 😉
And good editing is as important as a good quality of the recording. Sometimes the conference organizers allow you to send them the raw footage, and they will do the editing for you. Most of the time, instead they will need to have the final version directly. And even if they are ok doing the edit themselves, I’d recommend you do it yourself so you can have full control of the final result and make it exactly as you want.
So yes, you would need to get good at video editing. But that doesn’t mean you need super expensive equipment or software.
Just try to make the flow of the video smooth, avoid heavy transitions and effects between different parts (as it is also recommended for the slides, btw), and “assemble” the video properly. That’s it.
Setup
There are other posts on this blog about recommended setup for video conferencing, recording, etc. (You can find them in the “Virtual sessions” category).
Most of those recommendations also apply when recording presentations for virtual events; therefore I will just add what I find useful for my recodings.
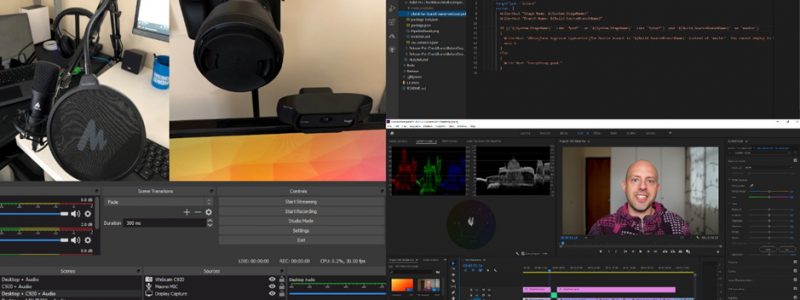
Screen recording: you have to record either the slides (btw take a look at this post about projecting the slides and not using the designer view) or the demos, so you need a software for that. There are many free and paid software to do so, but most of the free pieces of software have some bold limitations (like recording time, resolution, etc.). That leaves you with 2 main options, IMHO, Camtasia (paid), or OBS (free).
Camtasia used to be my go-to software for both recording and editing, but the most recent updates made it not so reliable. Plus, it records in its format, so you need to edit it with Camtasia anyway. And it is definitely not cheap. But overall still a good tool, especially because it does everything you need, and it is pretty simple to use.
OBS, instead, is completely free and open-source, but the learning curve is steeper. Even though it is mainly designed for live streaming, it is much more powerful than Camtasia when it comes to recording. You can create many presets called “scenes”. I have one scene with camera + audio, another one with my main screen + audio, yet another one with side webcam + screen + audio.
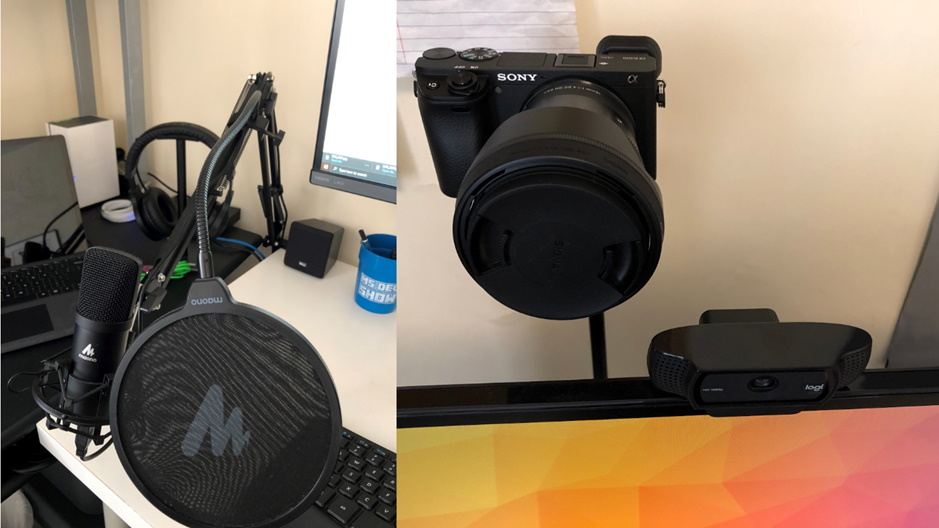
Record yourself: when it comes to record just yourself talking to the camera, there are more possibilities. You can use a (good) webcam or a DSLR/mirrorless camera. If you use a webcam, you can either use the same tool you use for screen recording (most of them allow you to capture the camera as well) or the webcam software. If using a dedicated camera, you can record directly on the camera or plug the camera to the PC and use the recording software.
In my case, I use a Sony mirrorless, the a6400, connected to the computer via the Elgato Camlink 4k USB adapter for the video and the external mic for the audio. I record with the computer instead of directly with the camera, using OBS, because I want to have the audio consistent thorough the whole presentation.
Editing: this is where you need proper software. There are a few free options, but they have even more limitations that the screen recording ones. As I have mentioned, I used to use Camtasia before, and, again, it is a fairly good tool. Since I started to make videos more frequently (I now make at least 2 videos each week), I switched to something way more professional: Adobe Premier Pro. The funny thing is that it comes for the same price as Camtasia, but it offers way more.
Just browse the internet for “Video Editing” and chose the one that fits your needs. Especially if you don’t do this often, go for something free and see if it is good enough for you.
Other: a tool I use all the time is ZoomIt. It is a small piece of software that allows you to magnify a specific area of the screen and make some annotations to it as you speak. It is very useful to show something that is small on your screen, or that you want to emphasize.
Tips and tricks
- Often audio quality is more important than video quality (as also said here). If you need to decide what to invest in, I’d instead go with a pretty good microphone and a decent camera. (Of course, if you can get both to be good it’d be even better). It is proven that people can pay much more attention to a video with good audio rather than the same video with not-so-good audio.
- No headphones when you record yourself talking to the camera if you can. It’s not the worst thing, but it doesn’t look very professional. Try instead to use an external mic (as stated above) and a pair of speakers. It will look much better.
- When recording in bursts, don’t make one too short. It would make it a nightmare for you to edit the recording afterward and, especially if you are talking directly to the camera, it would be pretty annoying for your audience to see all the “jumps”.
- Remember that not everyone has the same screen and resolution as you do, and that a lot of people use mobile phones for watching. While I recommend recording your videos in 1080p for quality, it is generally a good idea to change the zoom level in browsers and tools like IDEs, etc. so the viewers can enjoy the content. When recording the demos, I usually keep it between 125% and 150%, and I use ZoomIt for the smaller text.
Let’s connect
If you want to know more about my setup, take a look at my detailed blog post about it https://dev.to/n3wt0n/my-home-office-revealed-1l42
Do you want to discuss this topic or are you just curious? Feel free to reach out to me at my twitter @davidebenvegnu.
And take a look at my YouTube channel youtube.com/CoderDave
For the editing process, I would suggest DaVinci Resolve (https://www.blackmagicdesign.com/it/products/davinciresolve/).
It’s a professional tool by Blackmagic with a free version which allows to do everything you need (and even much more) . It deserves to take a look